Salesforce is a well-known and popular CRM solution that enables businesses to centralize and manage customer interactions. However, as businesses accumulate vast amounts of customer data, Salesforce's inherent limitations in scalability and data flexibility can hinder effective analysis. This makes it difficult for businesses to extract real-time insights from their customer data or integrate it with other data sources for a holistic view.
Migrating data from Salesforce to MongoDB addresses these challenges. MongoDB's scalability and flexible schema design make it easy for businesses to store and easily analyze large datasets. This improved data handling enables real-time analytics, empowering businesses to act on customer behavior and preferences as they unfold.
Let’s start with an overview of both platforms before looking into the details of the different methods for this integration.
Salesforce – The Source
Salesforce is a popular cloud-based Customer Relationship Management (CRM) system that effectively manages key aspects of a company’s interaction with its clients. It tracks customer data along with internal team interactions, providing an integrated view across departments such as sales, marketing, and customer support. This integration facilitates enhanced customer relationship management, leading to improved organizational growth.
Some key features of Salesforce include:
- Salesforce provides extensive customization options to align the platform to your specific operational needs and procedures. These options are available through settings and apps in the Salesforce AppExchange.
- Salesforce enables the marketing team to create personalized connections with consumers, tailoring communications for different campaigns.
- The Salesforce Engage tool bridges the gap between marketing and sales departments by providing sales teams with direct access to valuable marketing insights. With this real-time information, sales representatives can tailor their outreach, personalize conversations, and identify the most promising leads.
MongoDB – The Destination
MongoDB is an open-source NoSQL database management system popular for its capability to handle large, distributed datasets efficiently. It utilizes BSON (Binary JSON) for organizing, saving, and accessing document-oriented data, facilitating rapid data processing.
One of MongoDB’s highlights is its dynamic schema capability. Unlike traditional relational databases requiring predefined schemas, MongoDB permits flexible storage of a wide range of data types and structures. This is particularly beneficial for applications handling evolving data without downtime for schema migrations.
Some key features of MongoDB include:
- MongoDB ensures high availability by using replica sets to manage data replication across multiple instances. The secondary replicas maintain copies of the data, while the primary server manages all read and write operations, ensuring automatic failover and data redundancy.
- MongoDB supports both horizontal and vertical scalability for effective resource allocation. It reduces the need for a separate, dedicated load balancer in some scenarios. However, larger deployments might still require it.
- MongoDB is a schema-less database; you don't need to use a template or pre-established structure. Each document in MongoDB can have its own structure, providing a more flexible data model than traditional row-and-column databases.
Best Ways to Connect Salesforce to MongoDB
Here are the different methods you can use to migrate data from Salesforce to MongoDB:
- Method 1: Using Estuary Flow for Salesforce to MongoDB integration
- Method 2: Using Data Loader and CSV files to send data from Salesforce to MongoDB
Method 1: Using Estuary Flow for Salesforce to MongoDB integration
Estuary Flow, a powerful, real-time ETL (Extract, Transform, Load) solution, can streamline data replication from Salesforce to MongoDB. With its intuitive interface and range of no-code connectors, creating a data integration pipeline is almost effortless, making it ideal for simplifying complex data replication tasks.
Here are the step-by-step instructions on how to use Estuary Flow for a Salesforce-MongoDB integration:
Prerequisites
Before you transfer your Salesforce data to MongoDB using a SaaS tool like Flow, you need to consider the following prerequisites:
Step 1: Configure Salesforce as the Source
- Log in to your Estuary account and access the dashboard.
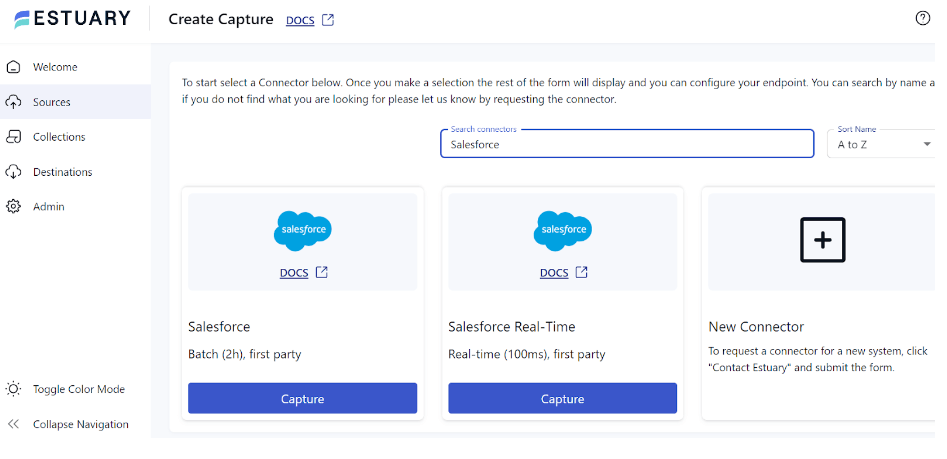
- Select the Sources option from the left pane.
- Click the + NEW CAPTURE button.
- Type Salesforce in the Search connectors box; the connector will appear in the search results. Click its Capture button. For this tutorial, let’s pick the Salesforce Real-Time connector.
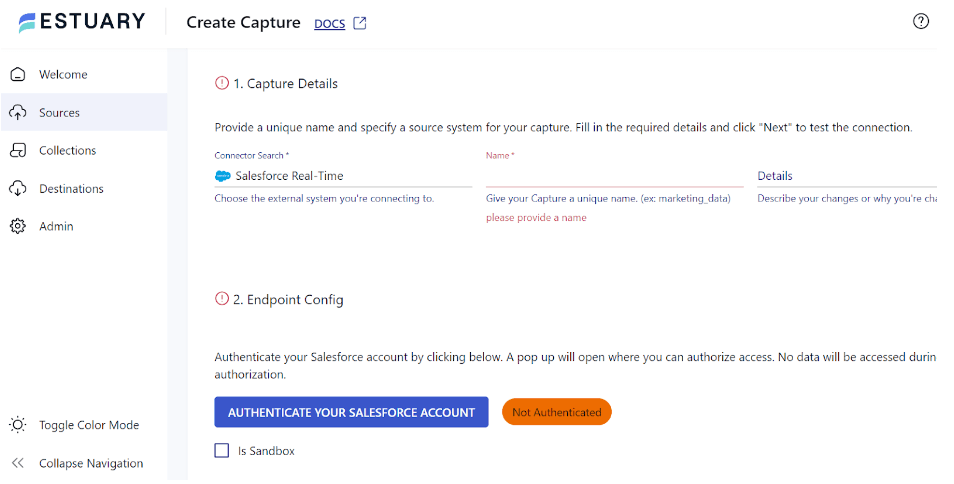
- On the connector configuration page, enter a unique Name for the capture. In the Endpoint Config section, click AUTHENTICATE YOUR SALESFORCE ACCOUNT and log in to your Salesforce account in the pop-up window.
- Click NEXT > SAVE AND PUBLISH to complete the source configuration. The connector will capture data from Salesforce objects into Flow collections in real-time with the Salesforce PushTopic API.
Step 2: Configure MongoDB as Destination
- Once the source has been configured, you need to configure the destination. To do this, click MATERIALIZE COLLECTIONS in the pop-up window that opens after a successful capture.
Alternatively, navigate the dashboard and click the Destinations options on the left pane.
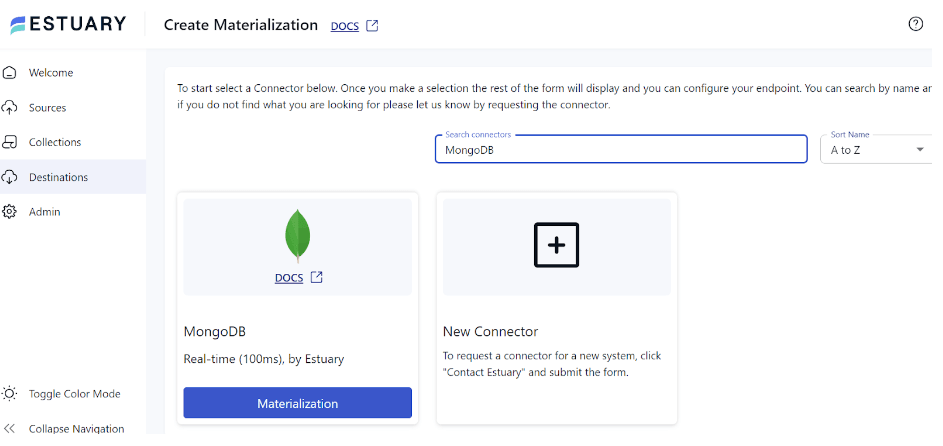
- On the Destinations page, click + NEW MATERIALIZATION.
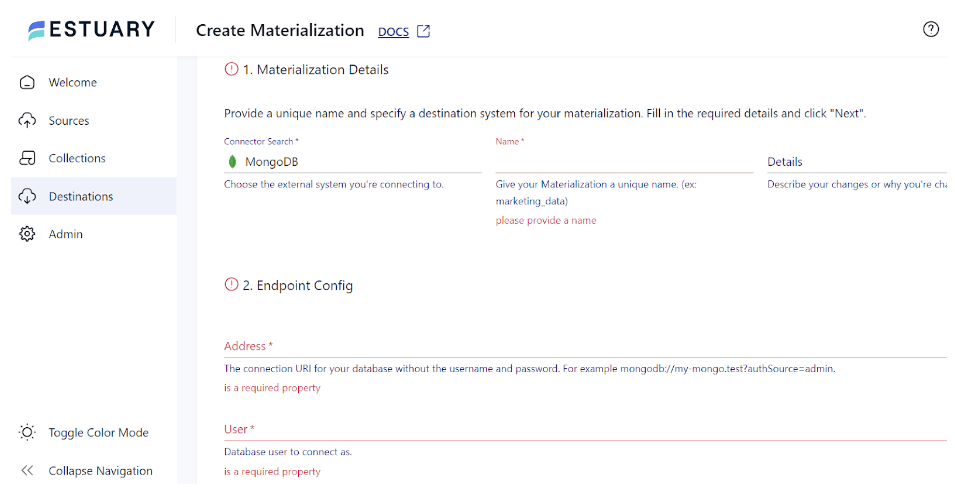
- Use the Search connectors box to search for the MongoDB connector. When you see it in the search results, click its Materialization button.
- On the MongoDB connector configuration page, enter essential information, including Name, Address, User, Password, and Database.
- Consider using the SOURCE FROM CAPTURE option in the Source Collections section to manually link a capture to your materialization.
- To finish configuring MongoDB as the destination end of the integration pipeline, click NEXT > SAVE AND PUBLISH.
The connector will materialize the Flow collections with your Salesforce data into MongoDB collections.
To learn more about Estuary Flow and connecting your data sources and destinations, check out our documentation on setting up a Data Flow.
Why Use Estuary Flow?
Here are key features of Estuary Flow, making it an excellent choice for your data integration needs.
- Pre-built Connectors: You can choose from hundreds of pre-built, no-code connectors to connect various sources and destinations. This makes data migration easier, as you don't have to write code to connect databases.
- Change Data Capture: Flow employs advanced log-based CDC methods at the source to actively record fine-grained data changes. This helps replicate data in real-time while preserving data integrity and lowering latency.
- Real-time Data Processing: Flow makes real-time data processing possible. By migrating data from multiple sources to the destination with millisecond latency, you can make real-time decisions for improved operational efficiency.
- Excellent Security Measures: It implements encryption and authentication procedures to guarantee data security during integration. This feature helps protect sensitive data and uphold regulatory requirements.
Method 2: Using Data Loader and CSV Files to Integrate Salesforce to MongoDB
An alternative method to load data from Salesforce to MongoDB involves the export/import of CSV files. Here are the detailed steps for this process:
Step 1: Export Data from Salesforce Using Data Loader
Data Loader is a client application used for mass import or export of Salesforce data. It can be used to import, update, delete, or export records.
When exporting data, Data Loader extracts records into CSV files.
Data Loader can be utilized in two different ways:
- User Interface: Use the GUI to define field mappings that translate field names in Salesforce to CSV column headers, configure parameters, and manage the import/export process.
- Command Line: Set up Data Loader for automated processing via the command line by providing details about the configuration, data sources, mappings, and actions in files.
Step 2: Import CSV to MongoDB
- Prepare Your CSV File: Ensure the CSV file is correctly formatted with column headers listed in the first row of your CSV file. Additionally, check for errors or blank cells to avoid import issues. Consider using Google Sheets or Excel to edit your files before importing them into MongoDB.
- Create a New MongoDB Database: If you don’t already have a database, use MongoDB Compass to create one.
- Click Create Database on the left sidebar, enter a name for your database, and create collections (similar to tables in relational databases).
- Click Create Database on the left sidebar, enter a name for your database, and create collections (similar to tables in relational databases).
- Import the CSV File: After preparing your CSV file and creating a new MongoDB database, import your CSV file into a collection with the following steps:
- In MongoDB Compass, select the database where you want to import the CSV data.
- Click Add Data > CSV.
- Browse to your CSV file, select it, and choose the collection into which you want to import the data.
- Confirm the field mappings and data types, then click Import.
- Verify Your Data: Once you have imported your data, you can verify its proper structure by viewing the collection in MongoDB Compass. Select the collection you want to examine, and MongoDB will display the data contained in that collection.
You can also utilize MongoDB queries to search for specific data based on certain criteria.
Limitations of Using Data Loader and CSV Files to Integrate Salesforce to MongoDB
- Lack of Real-time Integration: Due to the time involved in manually exporting Salesforce data as CSV and importing it into MongoDB, this method lacks real-time capabilities. As a result, it isn’t suitable if you require real-time data analysis.
- Increased Risk of Errors: There is an increased chance of errors or inconsistencies, such as formatting issues, data type mismatches, and missing values. The only way to ensure data integrity is with manual checks and corrections.
In Summary
Integrating Salesforce and MongoDB offers businesses substantial advantages in streamlining analysis and gaining valuable customer insights. You can load Salesforce data into MongoDB using Salesforce Data Loader or Estuary Flow.
While the Data Loader and CSV approach is effective, it is associated with drawbacks such as requiring manual transformations, lacking real-time capabilities, and increased risk of errors. If you need a seamless, real-time solution with minimal manual intervention, consider using Estuary Flow. Its user-friendly interface, pre-built connectors, and CDC capabilities streamline the entire integration process, ensuring your MongoDB database always reflects the latest Salesforce updates.
With hundreds of ready-to-use connectors, Flow helps you effectively integrate data from various sources to your choice destination in just a few minutes. Register for a free Estuary account or log in to get started!
FAQs
- Why integrate Salesforce with MongoDB?
Integrating these platforms offers several benefits. It creates a more flexible and scalable data environment, allows for deeper analysis across datasets, and can help reduce data storage costs over time.
- Can I achieve real-time data synchronization between Salesforce and MongoDB?
Yes, real-time integration is possible. Tools like Estuary Flow use advanced techniques, such as Change Data Capture (CDC), to replicate data between Salesforce and MongoDB with minimal delays.

About the author
With over 15 years in data engineering, a seasoned expert in driving growth for early-stage data companies, focusing on strategies that attract customers and users. Extensive writing provides insights to help companies scale efficiently and effectively in an evolving data landscape.
Popular Articles


