In today's world of data management, creating a solid database starts with designing the right schema. This becomes even more crucial when working with enterprise-grade database systems like PostgreSQL. Using a Postgres schema brings order, organization, and efficiency to handling data.
Every time you interact with the PostgreSQL database, the schema comes into play, controlling how data moves. Efficiency is key here as it translates to responsive applications and quick analytics. In a world where speed matters, the Postgres schema acts as a guard against any slowdowns.
In this comprehensive guide, we’ll start by looking at the key features of PostgreSQL schema and the role it plays. Then we will move to our tutorial on creating a Postgres schema, exploring how you can easily handle schema changes in Postgres, and ensuring consistency when moving your data. Let’s dive in!
What Is PostgreSQL?
PostgreSQL is a widely used open-source database management system that is known for its stability and adaptability, with functionalities for both relational and non-relational data formats.
PostgreSQL's open-source nature provides cost benefits as well as customization options which makes it ideal for a variety of applications. With its long-standing track record of reliability and flexibility, you can introduce new features as needed.
Now within PostgreSQL, you can organize your data using "schemas". Let’s see what these are.
What Is a Postgres Schema?
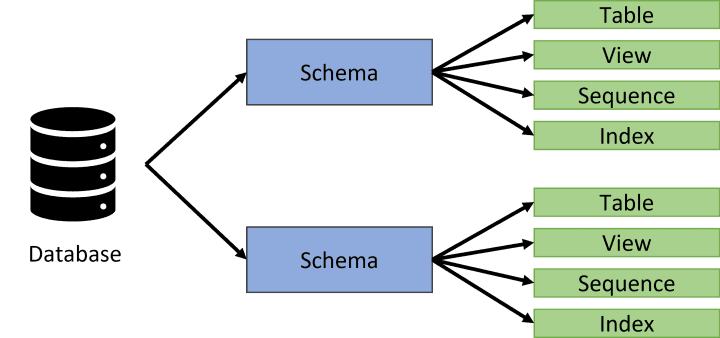
Schemas are collections of database objects that are logically grouped. These objects include tables, views, indexes, data types, functions, operators, and more. Schemas help segment objects in a database into separate namespaces which means objects with the same name can exist in different schemas without conflict.
Here are the important features of PostgreSQL Schemas:
- The same database can contain one or more named schemas.
- Schemas help organize database objects into logical groups for clarity and ease of operation.
- Named database objects can share the same name in a single database but stay unique as long as they're housed in separate schemas.
- The Postgres public schema exists in every new database and is the default schema. If you create objects without specifying a schema, they are created in the public schema.
- PostgreSQL uses the schema search path order to determine which schema to check first when looking for an object. Typically, in the default search paths, the public schema gets the first look unless you change this order.
Postgres Schema Creation: The Prerequisites
Before getting into the specifics of creating Postgres schemas, you should have your environment set up correctly. This means having both PostgreSQL and its administrative tool, pgAdmin, installed and ready to go on your system.
Whether you're using Windows or Linux, the process is quite easy to use. This section will guide you through the installation procedures for both platforms, starting with Microsoft Windows.
Installing PostgreSQL on Windows
With a few steps, you can have the PostgreSQL server up and running on your Windows system. Here’s how you can get started:
- Download the Installer: Head to the official PostgreSQL website and download the installer suitable for your Windows version.
- Run the Installer: Once downloaded, double-click on the installer file to start the installation process.
- Choose installation options: During the installation, you'll be prompted to select components. If unsure, go with the default selections.
- Set password: You'll be asked to set a password for the PostgreSQL superuser (usually 'postgres'). Remember this password as you'll need it later.
- Choose installation directory: Decide where you want to install PostgreSQL on your system and select the directory.
- Complete the installation: Follow the remaining prompts and the installation will be completed. After installation, the PostgreSQL service will start automatically.
Installing pgAdmin on Windows
pgAdmin is the official administrative GUI tool for PostgreSQL. Here are steps to install pgAdmin on Windows:
- Download pgAdmin: Go to the pgAdmin download page and download the pgAdmin installer for your Windows version.
- Run the installer: Double-click the installer exe file to launch the installation wizard.
- Choose Install Options: Select components to install like pgAdmin desktop and web modes. Choose the install location.
- Set a master password: You will be prompted to set a master password for pgAdmin. Remember this password.
- Complete installation: Follow the remaining steps and pgAdmin will be installed on your Windows system.
Installing PostgreSQL on Linux (Ubuntu)
Follow these steps to get PostgreSQL running on your Ubuntu system:
- Update system packages: Update the package index on your Linux system to refresh the list of available packages:
plaintextsudo apt update- Install PostgreSQL: Install the PostgreSQL package by running:
plaintextsudo apt install postgresql postgresql-contribWhen asked, press Y to confirm the installation.
- Service management: After installation, the PostgreSQL service starts automatically. You can check its status with:
plaintextsudo systemctl status postgresql- Manage Postgres service: To start, stop, or restart the service, use the commands:
plaintextsudo systemctl start postgresql
sudo systemctl stop postgresql
sudo systemctl restart postgresql
Installing pgAdmin on Linux
To install pgAdmin on Linux distributions like Ubuntu:
- Install prerequisites: First, update the package index on your Linux system:
plaintextsudo apt updateInstall Python, pip, and other dependencies:
plaintextsudo apt install python3 python3-pip libpq-dev python3-dev- Create virtual environment: Create a directory for pgAdmin and activate a Python virtual environment:
plaintextmkdir pgadmin4
cd pgadmin4
python3 -m venv pgadmin4
source pgadmin4/bin/activate- Install pgAdmin: Within the virtual environment, install pgAdmin:
plaintextpip install pgadmin4- Configure pgAdmin: Create a config file and set options like log file path:
plaintextnano pgadmin4/lib/python3.6/site-packages/pgadmin4/config_local.py
Add:
LOG_FILE = '/var/log/pgadmin/pgadmin.log'- Setup pgAdmin: Run the setup script and enter admin login info:
plaintextpython pgadmin4/lib/python3.6/site-packages/pgadmin4/setup.py- Run pgAdmin: Start the pgAdmin 4 web server:
plaintextpython pgadmin4/lib/python3.6/site-packages/pgadmin4/pgAdmin4.pyOnce PostgreSQL and pgAdmin are installed and running, you can proceed to connect to Postgres, set up schemas, and explore more of what PostgreSQL offers.
Accessing the PostgreSQL Database
Now that we have seen how to install PostgreSQL, let’s see how to access the database. You can do this using the psql command-line tool or the pgAdmin GUI tool.
Access the PostgreSQL Database Using psql Command-Line Tool
The psql tool is the interactive terminal program by PostgreSQL. It lets you interact with PostgreSQL databases, execute SQL statements, and manage database objects.
Here’s how you can use psql to connect to a Postgres database:
- Launch the psql Tool:
Open the SQL Shell (psql) from your system's program list or terminal.
- Enter Connection Details:
When prompted, provide the necessary details:
- Server: Typically, it's "localhost" if the database is on your machine.
- Database: Your database name, or press Enter to use the default.
- Port: The default is usually 5432.
- Username: The default user is often "postgres".
- Password: Input the password you set during the PostgreSQL installation.
- Begin interaction:
Once connected, you'll see a prompt like mydb=>. This means you're ready to start entering commands.
Access the PostgreSQL Database Using pgAdmin Tool
Here's a clear and straightforward guide to help you connect to your PostgreSQL database using the pgAdmin tool:
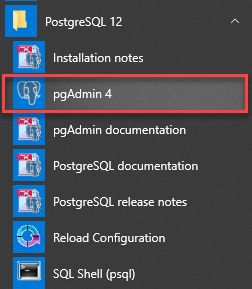
- Launch pgAdmin
- Start by searching for pgAdmin on your computer.
- Click on the pgAdmin application to open it.
- The application will open in your web browser, displaying the pgAdmin dashboard.
- Initiate server creation
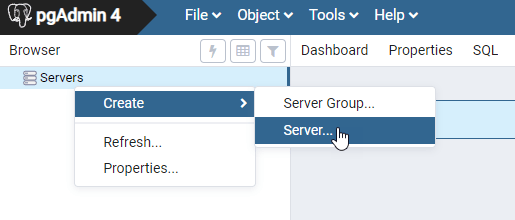
- In the dashboard, locate the Servers node.
- Right-click on Servers and choose the Create option followed by the Server… menu item.
- Server details configuration
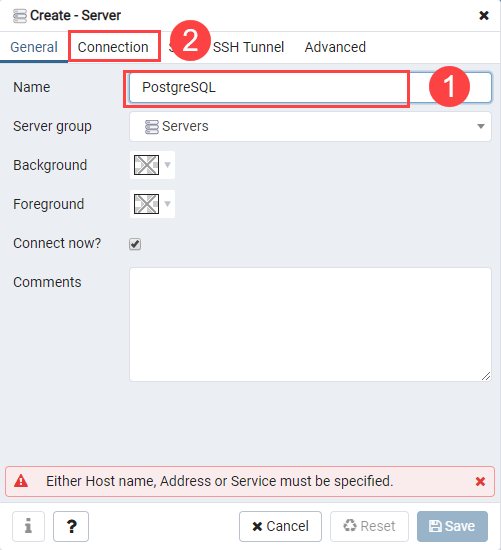
- A Create-Server window will pop up.
- In the Name field, input a desired name for your server, for instance, "PostgreSQL1".
- Navigate to the Connection tab located within the same window.
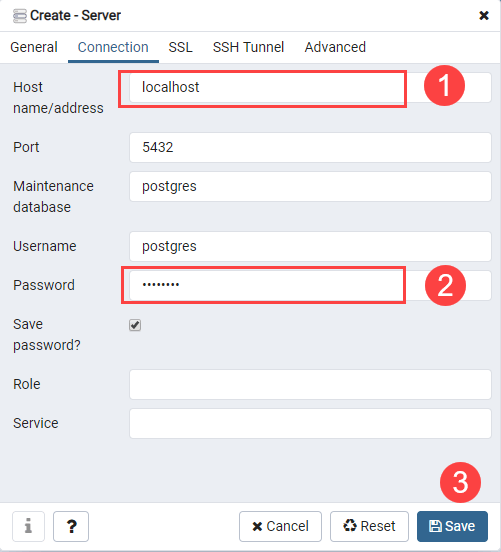
- Input connection details
- In the Host field, provide the name of your host. Typically, for local databases, you'll input "localhost".
- For the Password field, enter the password associated with the Postgres user.
- Once all details are filled in, click the save button.
- Access the server
Image Source
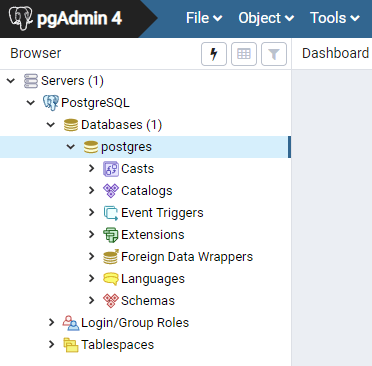
Back in the main pgAdmin dashboard, click on the Servers node to expand and view the list of servers.
You should now see your newly added server listed. By default, PostgreSQL includes a database named postgres which should be visible under your server's list of databases.
You’re now ready to create and use a Postgres schema. But, before we delve into the steps to do this manually, let’s first look at how SaaS tools like Estuary Flow can help streamline your schema management.
Estuary Flow: A Reliable Solution for PostgreSQL Schema Management
Estuary Flow is a cutting-edge DataOps platform designed to manage real-time data processing efficiently. Among its arsenal of features, Flow’s Postgres connectors enable robust Change Data Capture (CDC) directly from PostgreSQL 10+ instances hosted anywhere - whether on-premises, on major clouds, or self-managed.
When it comes to handling schema evolution, manual techniques can be time-consuming and prone to errors. However, Estuary Flow automates this process, ensuring smooth transitions as your schema evolves over time.
Let's take a real-world scenario where the schema of a PostgreSQL database needs to evolve due to changing requirements. With Estuary Flow, handling such changes becomes a breeze, allowing for automatic schema inference and ensuring data integrity and consistency.
Some of the key features of Estuary Flow include:
- Built-in testing and reliability: Integrated unit tests maintain data accuracy and adapt to evolving data pipelines.
- Extensibility: It connects easily with PostgreSQL through its open protocol capture and materialization connectors.
- Real-time materializations: Flow provides a live view of data as it updates, giving you instant access to the latest information.
- Data transformations: It supports real-time SQL and TypeScript transformations which provides a flexible approach to data manipulation.
- Schema inference: It transforms unstructured data into structured formats to enhance data operations and insights in PostgreSQL databases.
- PostgreSQL Specific Connectors: Flow is integrated with connectors specially designed to both capture data from and materialize data into PostgreSQL.
Steps on How to Create a Schema In PostgreSQL
In this section, we will walk you through the step-by-step process to create PostgreSQL schemas using 2 main methods: the psql command line tool and the pgAdmin graphical user interface (GUI).
The psql command line tool lets you execute PostgreSQL commands directly from your terminal or command prompt. This can be useful for automating schema creation via scripts or if you are working on a remote server where you only have terminal access. The psql CLI provides flexibility for power users.
On the other hand, pgAdmin offers a graphical, visual way to interact with PostgreSQL. The pgAdmin client lets you easily create schemas and other objects via point-and-click instead of typing out commands. This can help manage schemas interactively on your local machine.
Create Postgres Schema Using psql
The SQL syntax for creating a new schema in Postgres is straightforward:
plaintextCREATE SCHEMA schema_name;This will create a new schema called schema_name in your current database.
But before you start using the Postgres CREATE SCHEMA command, here are a few things to remember:
- Schemas must have a unique name within each database
- By default, the owner is the role that executes CREATE SCHEMA
- Can add IF NOT EXISTS to avoid errors creating existing schemas
Now let's look at examples of creating a schema using psql.
- Step 1: Connect to the Postgres server from your terminal:
plaintextpsql -h localhost -U postgres- Step 2: Check existing schemas with the \dn command. This lists all schemas in the current database.
- Step 3: Create the schema. Here is an example of creating a schema named ‘ecommerce’:
plaintextCREATE SCHEMA ecommerce;- Step 4: Set Schema Owner. By default, the owner of a newly created schema is the role that executed the CREATE SCHEMA statement.
You can also specify the owner explicitly like:
plaintextCREATE SCHEMA my_schema AUTHORIZATION some_user;This sets the owner of my_schema to some_user.
You can also grant privileges to the schema using the GRANT command if needed. For example:
plaintextGRANT ALL ON SCHEMA myschema TO role1;- Step 5: Create tables within the new schema using CREATE TABLE. For example:
plaintextCREATE TABLE myschema.products();Access Objects in a PostgreSQL Schema
To access PostgreSQL schema objects, use a qualified name format, separating the schema and table name with a dot.
plaintextschema_name.table_name\For instance, to access a `products` table in a `sales` schema, you'd use:
plaintextsales.productsSimilarly, for a `members` table in a `community` schema, you'd use:
plaintextcommunity.membersThis dot-separated format distinctly identifies and accesses objects within specified schemas.
Create Postgres Schema Using pgAdmin
The pgAdmin GUI provides an easy way to interact with PostgreSQL visually. Let’s see how you can create a schema with pgAdmin:
- Step 1: Connect to the database server in pgAdmin.
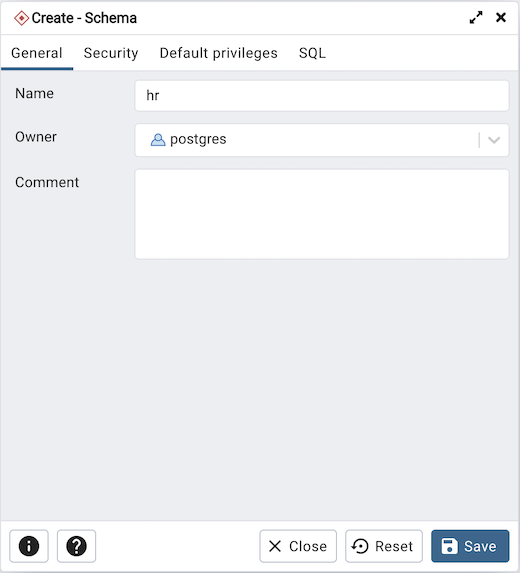
- Step 2: Right-click on the database in pgAdmin and choose Create > Schema. This opens the Schema dialog box.
- Step 3: On the General tab, enter the schema name in the Name field following naming conventions.
- Step 4: Set the schema Owner by selecting a role from the dropdown.
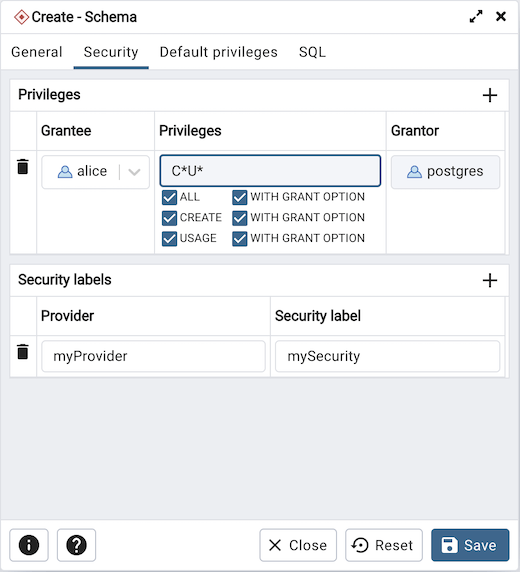
- Step 5: Click the Security tab and use the Privileges panel to create privilege for the role on this schema.
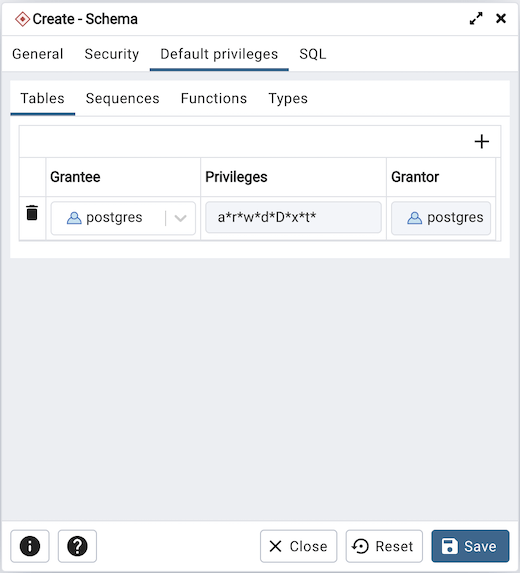
- Step 6: Use the Default Privileges tab to set default privileges on objects that will be created in this schema.
- Step 7: Click Save to create the schema.
- Step 8: Verify the schema exists by expanding the Schemas tree in pgAdmin.
- Step 9: Right-click on the schema and choose Create > Table to create tables within the schema.
How to Manage Your Postgres Schema
Once you create a schema in PostgreSQL, you need to perform various management tasks like renaming, deleting, transferring ownership, or viewing details. Properly managing your schemas is important for keeping your database organized over time.
PostgreSQL provides several SQL statements and system catalogs to help you manage your schemas. Here are some common schema management tasks and the commands you can use to perform them:
Renaming a Schema (Using Alter Schema)
To rename an existing schema, use the ALTER SCHEMA statement:
plaintextALTER SCHEMA old_name RENAME TO new_name;This will rename the schema 'old_name' to 'new_name'.
Deleting a Schema (Using Drop Schema)
Use the DROP SCHEMA statement to delete a schema:
plaintextDROP SCHEMA schema_name;By default, the schema must be empty before dropping. To delete a schema and all contained objects, use:
plaintextDROP SCHEMA schema_name CASCADE;Transferring Ownership of a Schema
You can use the ALTER SCHEMA statement for transferring ownership of a schema to a new user:
plaintextALTER SCHEMA schema_name OWNER TO new_owner;The user must have the appropriate permissions to transfer ownership.
Viewing Schema Information Using SQL Commands
To view details on schemas and to list Postgres schemas, you can query the pg_namespace system catalog. For example:
plaintextSELECT * FROM pg_namespace;This will list all schemas in Postgres, owners, and other details. You can also filter it to show one Postgres schema only.
Key Takeaways
Creating and managing Postgres schemas remains crucial for developers working with Postgres databases. Correctly using a Postgres schema helps prevent naming conflicts, uphold access controls, and maintain an organized database structure.
Once your database is in production, keeping your data synchronized and up-to-date across all your systems becomes the next challenge. Rather than building complex pipelines, purpose-built tools like Estuary Flow provide an easier solution.
With Flow, the heavy lifting of schema evolution and schema inference is automated, making it much simpler to adapt to changes in your Postgres database.
Flow’s real-time change data capture shines by replicating your Postgres data in real-time to destinations like Snowflake. It efficiently handles schema changes, ensuring your data remains consistent and updated without manual intervention.
If seamless data synchronization is important for your Postgres application, give Estuary Flow a try by signing up here. With features such as automatic schema inference, real-time CDC, and automated data integration using Flow, you can build a streamlined application and set up robust data pipelines more efficiently.
Frequently Asked Questions
What Is the Difference Between Postgres Database and Postgres Schema?
PostgreSQL Database:
- Can accommodate multiple schemas.
- Acts as the main storage unit, keeping all data and logs.
PostgreSQL Schema:
- Organizes database objects under one name.
- Operates within a single database for a clear structure to the stored objects.
What Are the Benefits of Using Postgres Schemas?
Using schemas provides several benefits:
- Better database design: Objects with different purposes can be separated into different schemas. This avoids naming conflicts.
- Code organization: Related objects can be logically grouped for easier maintenance. For example, objects for an application can be put in a single schema.
- Access control: By default, users can't access objects in schemas they don't own. However, permissions can be granted on schemas to let users access specific objects.
What are Common Schema Creation Mistakes to Avoid?
Creating a good database schema is important for high performance and easy maintenance of your PostgreSQL database. However, it's easy to make mistakes during the schema design process that can cause problems down the road. Here are common pitfalls to avoid:
Not Planning Schemas Upfront
Attempting to design schemas on the fly as new features are added often causes inefficient, hard-to-maintain schemas. Always invest time upfront to think through and plan your database needs before implementation. Consider how tables will relate, what queries you'll need to support, and how data volumes may grow over time.
Poor Naming Conventions
Inconsistent or vague naming of database objects makes schemas harder to understand. Establish naming conventions early on and stick to them. For example, table names could be plural nouns and column names singular nouns.
Overloading Tables With too Many Columns
Trying to squeeze too many unrelated attributes into a single table produces wide, unwieldy tables that are hard to maintain. It's better to split logical groups of related attributes into separate tables connected via foreign keys.
Not Normalizing Data
Failing to eliminate data redundancy through normalization can cause inconsistencies and inefficient storage. When planning schemas, aim for the third normal form as a baseline.
Ignoring Index Performance
Adding too many unnecessary indexes slows down writes while too few indexes result in slow reads. Carefully consider index needs based on typical query patterns.
Using Inefficient Data Types
Choosing inappropriate data types, like storing strings in VARCHAR(255) by default or using FLOAT for currency, wastes storage space and impacts query performance.
Not Planning for Extensibility
Requirements change over time. Look for ways to make schemas flexible for future needs, like adding "modifier" columns to accommodate new attributes.

About the author
With over 15 years in data engineering, a seasoned expert in driving growth for early-stage data companies, focusing on strategies that attract customers and users. Extensive writing provides insights to help companies scale efficiently and effectively in an evolving data landscape.
Popular Articles


