A MySQL connector is a vital tool for the efficient operation of MySQL databases with other software applications. It abstracts the complexity of the underlying database system and provides an interface the application can use to perform various tasks.
But the real challenge lies in setting up and configuring these connectors which is not always a straightforward task. It requires understanding the specific processes, following the right steps, and overcoming potential technical issues.
With this guide, we will make this complex process simpler. We’ll walk you through everything you need to know about MySQL connectors, from the basics to the detailed steps of installing and configuring them. Additionally, we’ll discuss how to leverage MySQL connectors for real-time Change Data Capture (CDC) pipelines using our streaming ETL solution Estuary Flow.
By the end of this guide, you’ll have a solid understanding of MySQL connectors and how to set them up and configure them effectively.
What Is MySQL?
Before we jump into the how-to’s of setting up MySQL connectors, let’s understand what we’re dealing with.
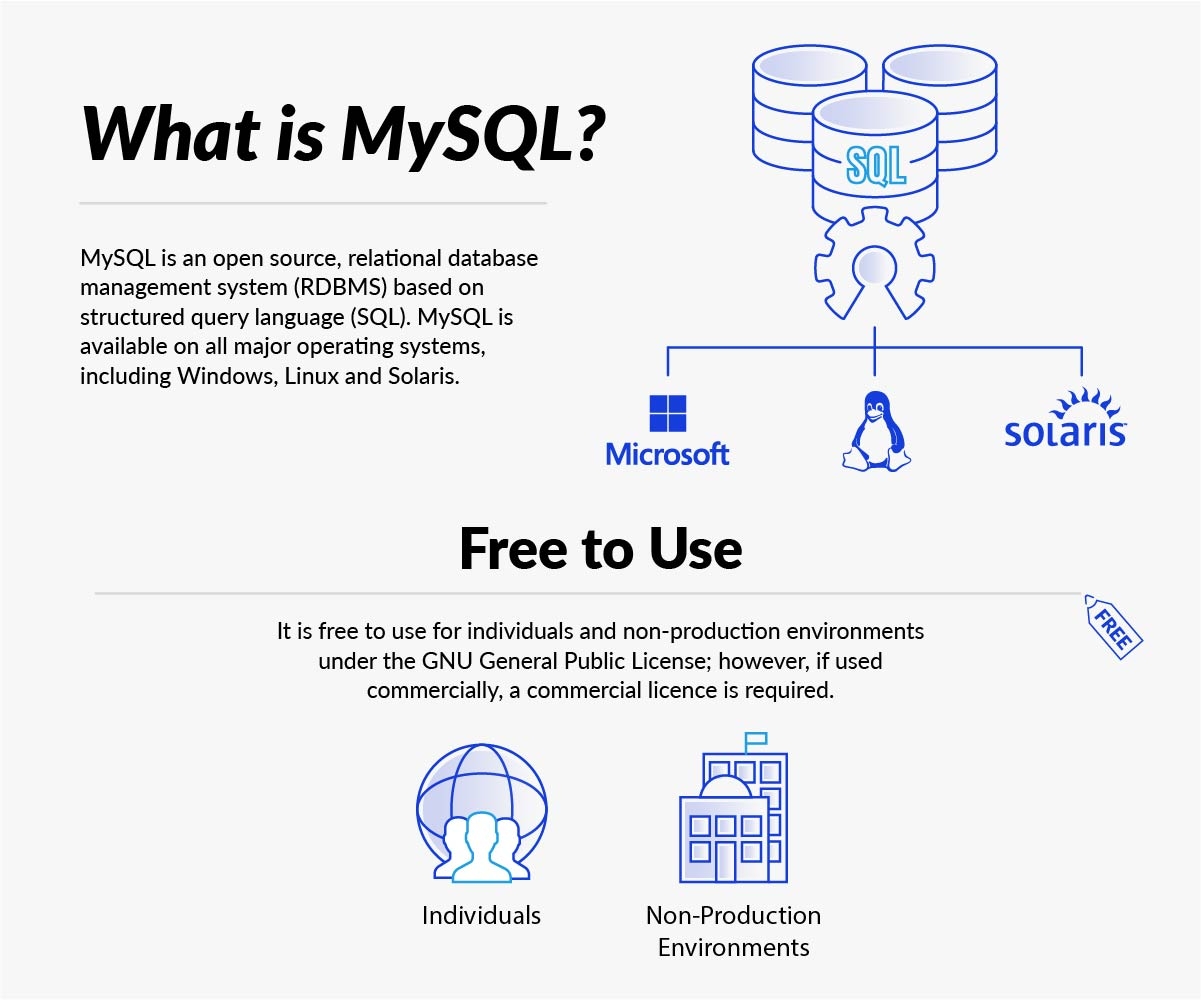
MySQL is an open-source Relational Database Management System (RDBMS). In simpler terms, it’s a system that helps organize and manage your data in a structured way. It uses a format of tables, rows, and columns to store data which makes it easier to handle and access large volumes of information.
Why do we choose MySQL? Here are some key features that make it stand out:
- Secure: It provides robust data security features to protect your data from unauthorized access.
- Fast Performance: MySQL is known for its speed which enhances efficiency when accessing data.
- Open-source: MySQL is free to use and modify which is beneficial for flexibility and cost-effectiveness.
- Scalability: It can adapt to different data requirements, making it suitable for both small and large businesses.
- Compatibility: MySQL works well with various operating systems including Linux, macOS, Windows, and Ubuntu.
- Supportive Community: If you encounter any issues with MySQL, there’s a large community of developers ready to help.
- Regular Updates: MySQL is frequently updated with new features and security enhancements, ensuring that it stays current and robust.
What Are MySQL Connectors?
MySQL connectors help your software applications talk to a MySQL database. They convert commands from these applications into a language that the MySQL database can understand and then interpret the database’s responses back into a form your application can use.
Here’s a rundown of the official MySQL connectors developed and maintained by Oracle:
- MySQL Connector/ODBC: Providing driver support for the Open Database Connectivity (ODBC) API, this connector works across Windows, Unix, and macOS platforms.
- MySQL Connector/J: Designed for Java applications, this connector uses the standard Java Database Connectivity (JDBC) API, allowing your Java programs to interact with MySQL.
- MySQL Connector/C++: This is your go-to connector if you’re developing C++ applications. It establishes a direct line of communication between your C++ code and the MySQL database.
- MySQL Connector/Python: Perfect for Python applications, this connector uses an API that complies with the Python DB API version 2.0. You don’t need any extra Python modules or MySQL client libraries – it’s ready to go out of the box.
- MySQL Connector/NET: This connector is for .NET developers. It provides a fully functional ADO.NET interface and supports all .NET languages. If you’re using Microsoft Visual Studio 2012 and onwards, you can even take advantage of MySQL for Visual Studio.
- MySQL Connector/Node.js: If you’re developing Node.js applications, you’ll need this connector. It provides an asynchronous API and uses X Protocol so that you can manage database sessions, work with MySQL Document Store collections, and use raw SQL statements.
In addition to these official MySQL connectors, there are also proprietary connectors developed by third-party companies. These are specifically designed to integrate with DataOps platforms and tools. They can offer additional features like improved performance, enhanced security, or easier configuration. These might include connectors for:
- Data visualization tools.
- Cloud-based data services.
- Specific data integration tools or platforms.
Remember, the right MySQL connector can make your data management tasks easier and more efficient. Choose the one that fits your requirements and the language or tool you’re using.
Setting Up & Configuring The Official MySQL Connectors
Now let's discuss how to set up 2 of the most commonly used ones: the ODBC and Python connectors. Let’s look at the process of installing and configuring each of them.
How To Install & Configure MySQL ODBC Connector
There are 4 main steps you need to follow to get the ODBC connector up and running.
Step 1: Download The MySQL Installer
First, you need to download the MySQL Installer.
- Go to the MySQL Community Downloads page.
- Find the installer file that matches your version of Windows (either 32-bit or 64-bit).
- Download it and save it to your computer.
Step 2: Install The MySQL ODBC Connector
Now that you have the installer, it’s time to get the MySQL ODBC Connector up and running.
- Locate the installer file on your computer and double-click it to open.
- Look for the “Select Products and Features” tab.
- Under the “MySQL Connectors” category, you’ll find the ODBC drivers. Click on “Connector/ODBC 8.0”.
- Pick the latest version of the MySQL ODBC driver for installation.
- Click on “Next” and then on the “Execute” button to start the installation.
- Once the installation is finished, click on “Next” again.
Step 3: Configure The MySQL ODBC Connector
Once installed, let’s move on to configuring the connector.
- Click on “Start” and type “ODBC” to search for ODBC Data Source (64-bit) on your computer. Click on it.
- In the open “ODBC Data Source Administrator” window, select the “System DSN” tab.
- Click on the “Add” button to set up a new connection.
- This will show a list of all installed ODBC drivers. Select “MySQL ODBC 8.0 ANSI Driver” and click on “Finish”.
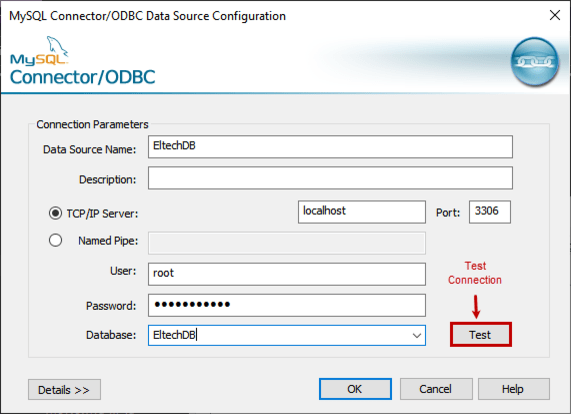
Now you’ll see the MySQL Connector/ODBC Data Source Configuration Wizard. This is where you’ll input your connection parameters.
The connection parameters you’ll need to specify are:
- Data Source Name.
- A short description of the Data Source.
- Hostname or IP address and the Port Number of the MySQL database server, in case of a TCP/IP connection.
Or in the case of a Named Pipe Protocol:
- Its name.
- Database username and password.
- The MySQL Database you want to connect to.
Once you've filled in all these parameters, click on the “Test” button to check your connection to the MySQL Database. If everything's in order, click “OK” to save the parameters.
Step 4: Connect To A MySQL Database
Now you’re ready to connect to your MySQL Database.
- Start the MySQL Server.
- Use the GRANT command to create an account with a username and password.
- Configure a Connector/ODBC DSN with the necessary parameters (DSN, Server, Database, User, Password).
Now you can connect to your MySQL Database using any ODBC-capable application like Microsoft Office.
How To Install & Configure MySQL Python Connector
Let’s look at the process of installing and configuring the MySQL Python Connector.
Step 1: Install The MySQL Python Connector
The installation process varies depending on your operating system. Here’s how you do it:
On Windows:
- Download the MySQL Installer from the official MySQL website.
- Run the installer and select MySQL Connector/Python as one of the products to install.
- Follow the prompts on the screen to complete the installation.
On Linux:
- Open your terminal.
- If you’re on an EL7, EL8-based platform, or Fedora, run the following command:
plaintext$> sudo yum install mysql-connector-python- If you’re using Debian or a similar system, first download the .deb file from the Connector/Python download site, then install it by running this command:
plaintext$> dpkg -i PACKAGE.deb (replace PACKAGE.deb with your downloaded file name)On macOS:
- Download the disk image package from the Connector/Python download site.
- Open the downloaded .dmg file and double-click the resulting .pkg file to install.
For all operating systems, you can also use pip, a package installer for Python. Simply run the following command in your terminal:
plaintext$> pip install mysql-connector-pythonStep 2: Configure MySQL Python Connector
Now that you’ve installed the Connector, the next step is to configure it to connect to your MySQL database. For this, open your Python script, then add the following lines, replacing ‘Estuary’, ‘password’, ‘127.0.0.1’, and ‘employees’ with your MySQL username, password, host, and database name respectively:
plaintextimport mysql.connector
cnx = mysql.connector.connect(user='Estuary', password='password',
                              host='127.0.0.1',
                              database='employees')
After this, you are ready to update your database and run queries on it.
MySQL Connector For Real-time CDC Data Pipelines
Let's dive deeper into MySQL specifically looking at real-time Change Data Capture or CDC in MySQL and see how you can keep all your storage systems, database applications, and data warehouses updated to the minute with the data changes happening in your MySQL database. This will help you keep all your analytical applications accurate, so you’re always working with the freshest data.
In a real-time CDC setup, we aim for:
- Reliability: The process must withstand errors or downtime.
- Low Latency: We need updated data within minutes or seconds.
- Efficiency: The process should not impact system performance, no matter the size of your data.
Now how do we accomplish this with MySQL? This is where the binary log comes in.
The MySQL binary log documents all modifications to your database, be it data or structure changes, in real time. Every operation that alters your data gets noted in this log and it happens as soon as the change is made.
Change data capture for MySQL takes advantage of the binary log to extract data from MySQL reliably, in real time. Changes in your MySQL database reflect almost immediately in your target systems.
Estuary Flow For MySQL CDC
When designing and managing real-time data pipelines to capture change data from MySQL and other sources, you need robust tools.
One such tool is Estuary Flow, which is our DataOps service developed specifically to enhance data movement and transformation using real-time event-driven ETL pipelines. Its main function is to capture data from different sources and deliver it where it’s needed efficiently, and in real-time.
Here’s a breakdown of Estuary Flow’s most prominent features:
- Automated Processes: Flow automates schema management and data deduplication processes which reduces the need for manual input and potential errors.
- Real-Time Transformations: Estuary Flow supports real-time data transformation using streaming SQL and TypeScript. This allows you to alter and view your data in real time.
- Scalability: Estuary Flow can handle data of varying volumes with ease. In fact, your Flow pipeline can support active workloads at a rate of 7GB/s CDC from databases of any size.
- Fault-Tolerant Architecture: Estuary Flow is built on a fault-tolerant architecture, ensuring that your data management processes continue uninterrupted even in the event of a fault or error.
- Accuracy and Control: Ensuring data integrity is a priority for Estuary Flow. It maintains the accuracy of your data pipelines with built-in schema controls and supports idempotent, exactly-once semantics.
- Real-time Data Capture: Estuary Flow allows data capture from varied sources, including databases, clouds, and SaaS applications. Real-time CDC from databases is also supported, ensuring efficient and precise data collection.
Setting Up MySQL CDC Using Estuary Flow
Flow provides a CDC Capture connector for MySQL databases that pulls data from the binary log. In Flow, capture is the process of pulling in data from an external source. In this case, this data will come from your MySQL database.
Here’s what happens when you set up a capture:
- The connector forms a connection to your MySQL database, acting as a Flow task.
- It binds to one or more resources in your database, such as tables.
- It adds the acquired data into a corresponding Flow collection.
But before MySQL can work with Estuary Flow, there are a few prerequisites to meet. Make sure all these requirements are fulfilled before attempting to use Flow to capture data from MySQL.
- Confirm that the binary logging is enabled in your database and the
binlog_formatsystem variable is set to‘ROW’.
The good thing is that starting from MySQL Server 8.0, binary logging is enabled by default with the default format set to ‘ROW’ already. However, if you need to change the binary logging format, you can use the following command:
plaintextSET GLOBAL binlog_format = 'ROW';- The binary log expiration period should be set to MySQL’s default value of 30 days (2,592,000 seconds). While you can go lower, we don’t recommend going below 7 days as it may increase the chance of unrecoverable failures.
The log expiration period can be modified using the following SQL command:
plaintextSET PERSIST binlog_expire_logs_seconds = 2592000;- Create a watermarks table named
"flow.watermarks". This table acts as a "scratch space" where the connector writes a small amount of data to ensure accuracy during backfilling.
Use the following commands for this:
plaintextCREATE DATABASE IF NOT EXISTS flow;
CREATE TABLE IF NOT EXISTS flow.watermarks (slot INTEGER PRIMARY KEY, watermark TEXT);- You should have a database user with the necessary permissions, including
REPLICATION CLIENTandREPLICATION SLAVEprivileges, permission to insert, update, and delete on the watermarks table, and read access to the tables being captured.
The following SQL commands create the new user if it is not present already and set the necessary access permissions for it:
plaintextCREATE USER IF NOT EXISTS flow_capture
  IDENTIFIED BY 'secret'
  COMMENT 'User account for Flow MySQL data capture';
GRANT REPLICATION CLIENT, REPLICATION SLAVE ON *.* TO 'flow_capture';
GRANT SELECT ON *.* TO 'flow_capture';
GRANT INSERT, UPDATE, DELETE ON flow.watermarks TO 'flow_capture';- If tables to be captured include
DATETIMEtype columns, ensure thetime_zonesystem variable is set to an IANA zone name or numerical offset. You can use the following command for this:
plaintextSET PERSIST time_zone = '-05:00'While the settings specified above are enough to enable MySQL CDC using Estuary Flow, cloud-hosted databases require additional settings before you can use them in your data pipelines. Check the MySQL Connector documentation for details.
Configuring The Estuary Flow MySQL Connector
Once your MySQL database is ready for CDC, you can proceed to configure the MySQL connector in Estuary Flow.
Here’s a comprehensive guide to configuring the MySQL connector in the Estuary Flow web app:
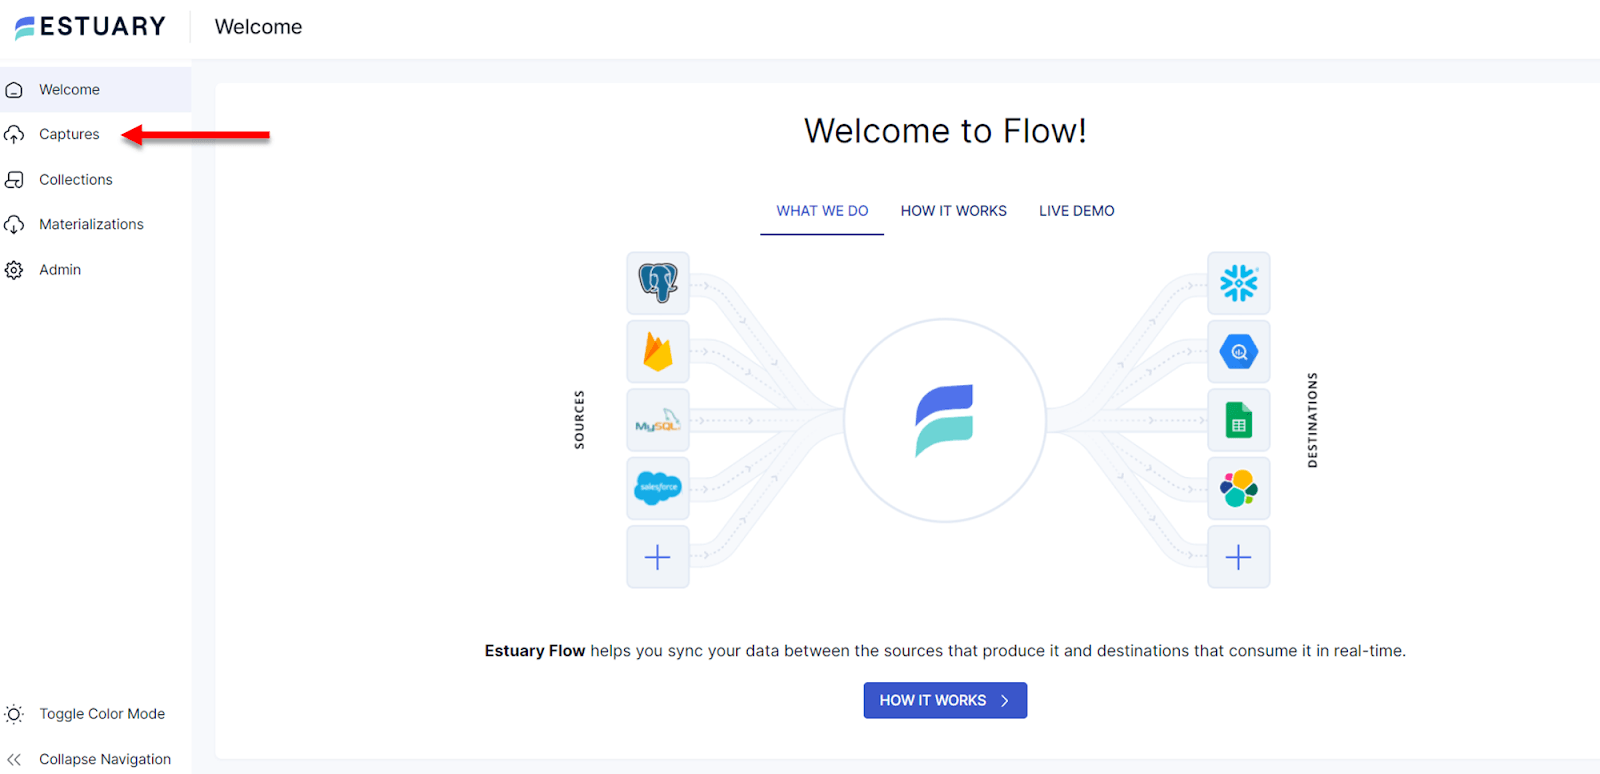
Step 1: Start by navigating to the Estuary web app and signing in with your account credentials.
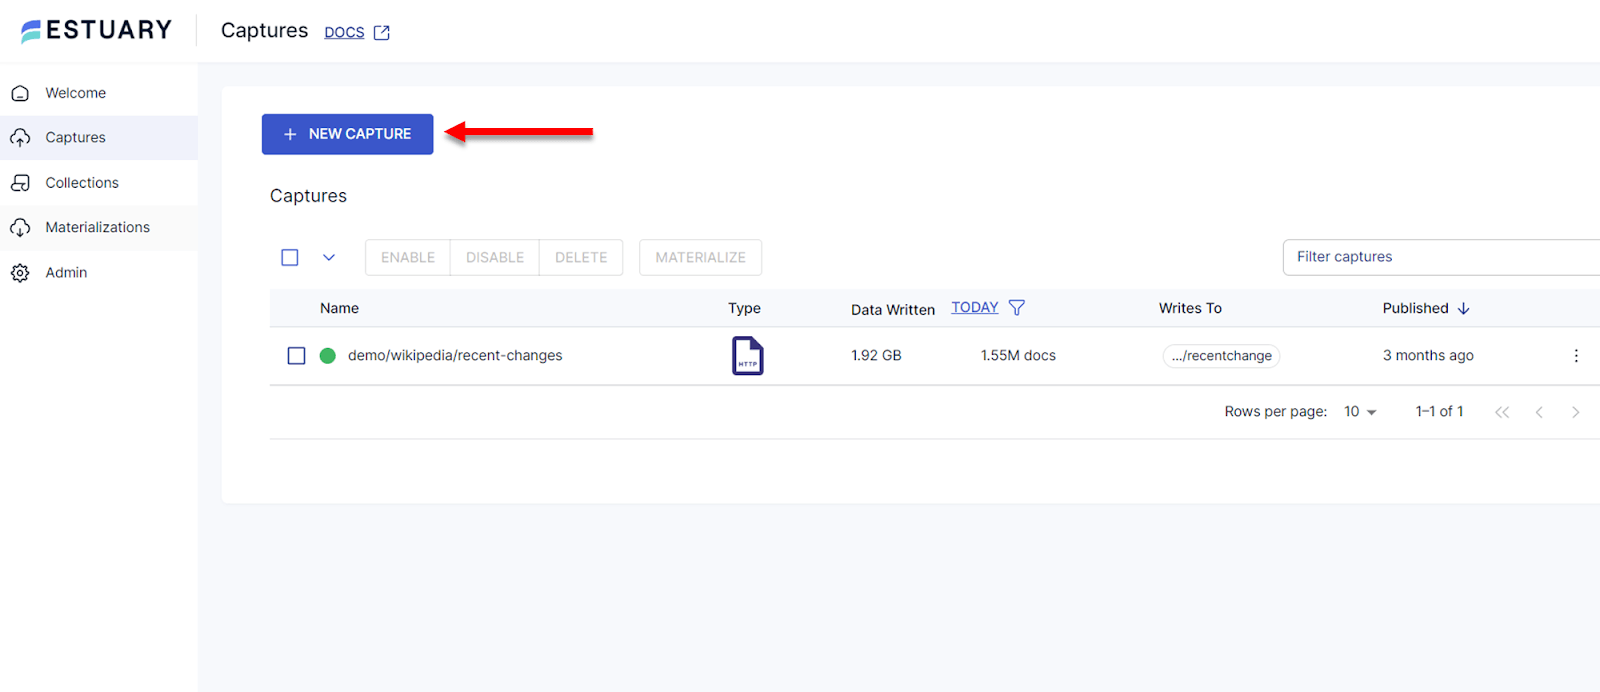
Step 2: Click on the “Captures” tab and then click on “+ New Capture”.
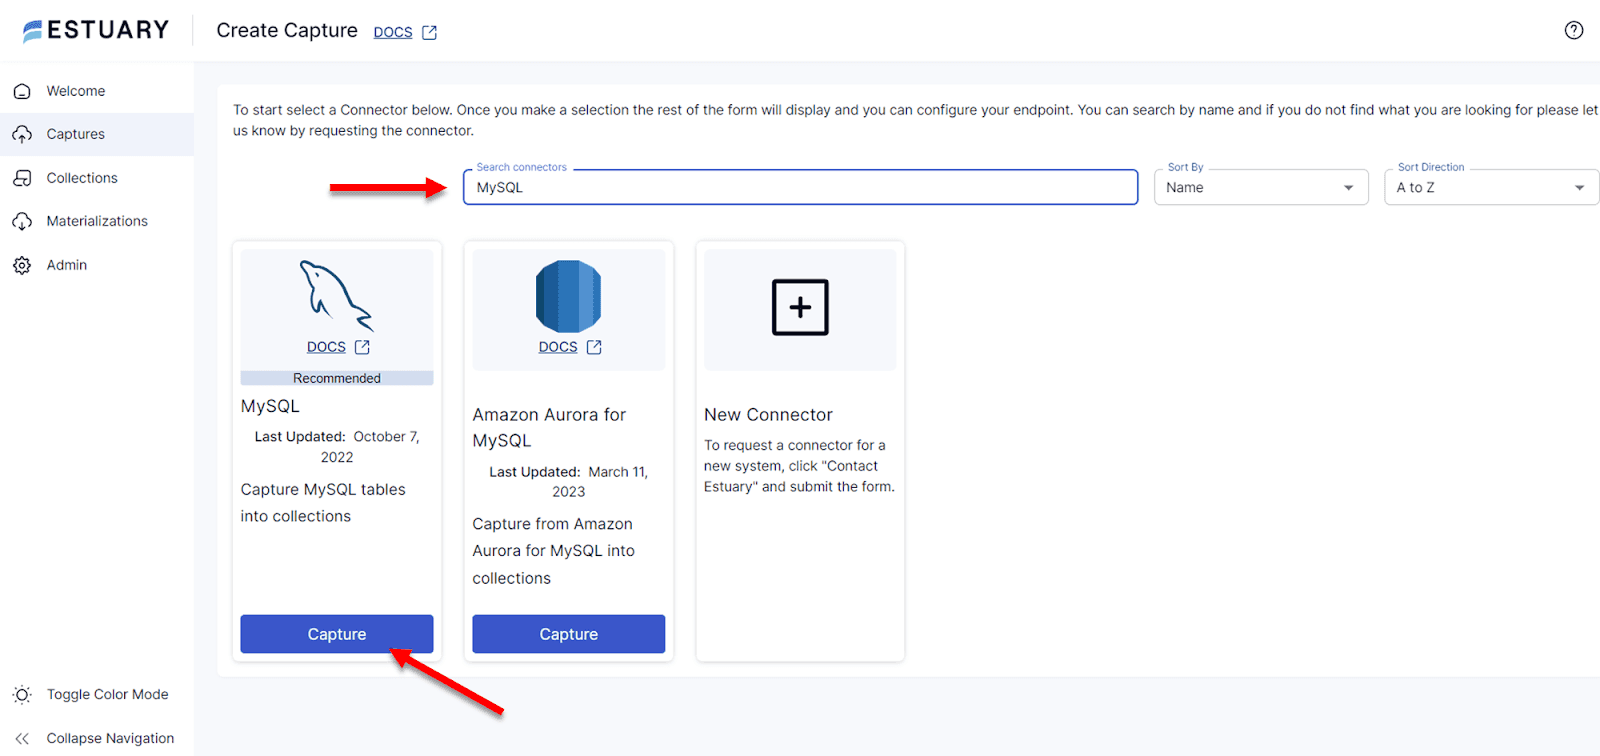
In the “search connectors” box, type in “MySQL”, then select “Capture” under the MySQL connector.
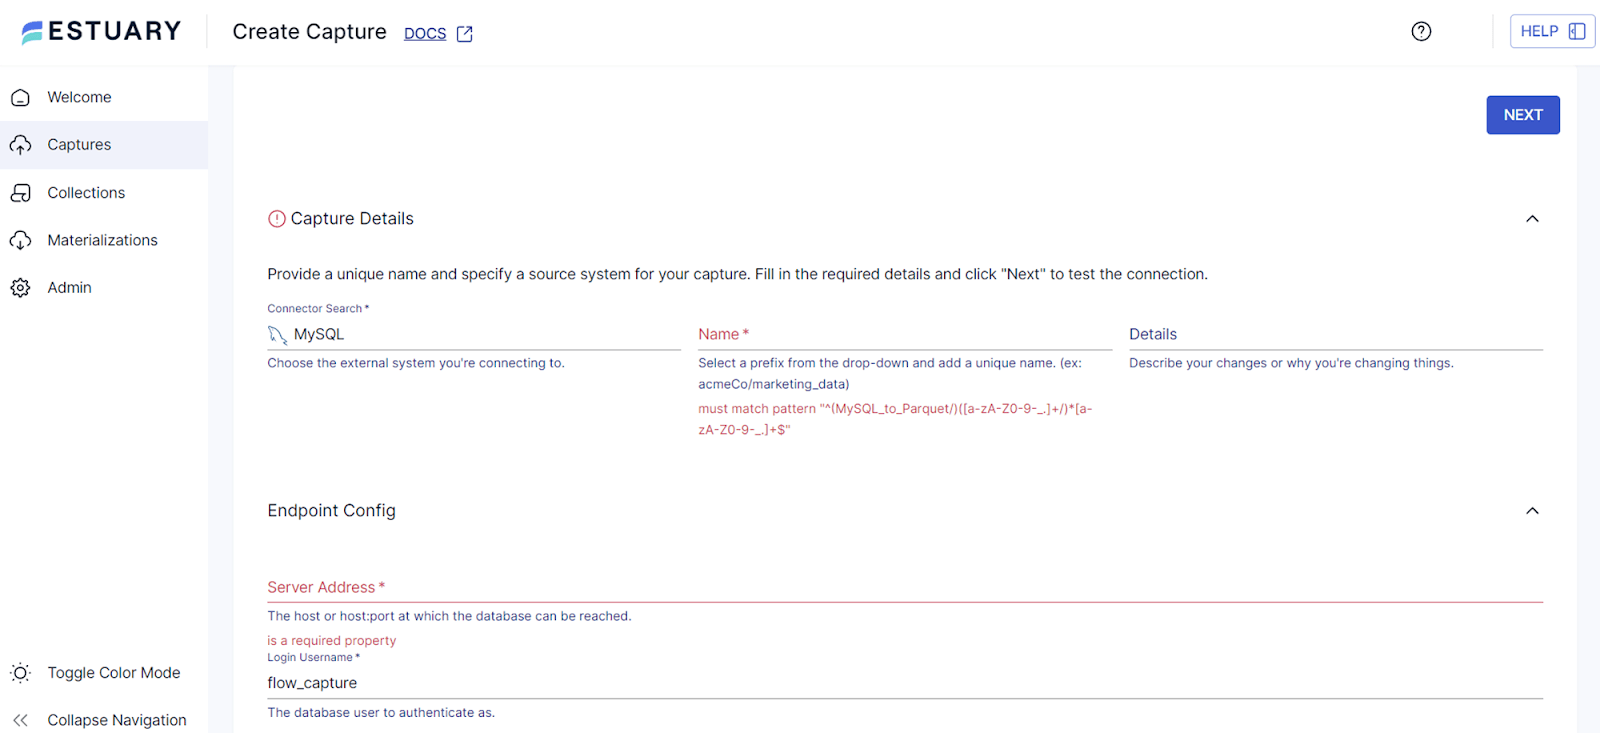
Step 3: Next, in the “Create Capture” window, you will need to provide information about the capture you’re creating.
These include:
- Name: Provide a unique name for your connector.
- Details: Optionally, you can describe the changes you’re making or why you’re creating this capture.
- Server Address: Enter the host or
host:portof your MySQL database server, likemysql.example.com:3306. - Login Username: Input the username of your MySQL user account used for capturing data, such as
flow_capture. - Login Password: Fill in the password for the MySQL user account you’re using for this capture.
Step 4: If necessary, provide additional details about the capture:
- Timezone: Specify the timezone for capturing datetime columns, if required.
- Watermarks Table Name: Enter the name of the table used for watermark writes, in the form <schema>.<table>, for example,
flow.watermarks. - Database Name: Enter the name of the database to connect to.
- Skip Binlog Retention Sanity Check: Select this checkbox if you wish to skip the binlog retention check.
- Node ID: Provide a unique 32-bit ID for each node in a replication cluster.
- Skip Backfills: Specify tables that you do not wish to backfill, as a comma-separated list of fully-qualified table names.
- Backfill Chunk Size: Define the number of rows to fetch from the database in a single backfill query.
- SSH Endpoint & SSH Private Key: If you’re using SSH tunneling for a secure connection, provide the endpoint of the remote SSH server and the private key to connect to it.
Step 5: After you’ve filled out the necessary details, click “Next”. The Flow web app will then attempt to establish a connection with your MySQL server using the provided details and display your tables as one or more collections.
Step 6: By default, all tables in your database will be captured as Flow collections. If there are any tables that you do not want to capture, you can remove them at this stage.
Step 7: Finally, click “Save and Publish”. A notification will be displayed once the capture has been successfully published. Your MySQL data is now ready to be captured and processed by Estuary Flow.
Once your data is captured, you can use it in a business application or store it in a data warehouse. For this, you can use Flow materializations to transfer the data in real-time to another application or storage system.
Conclusion
Understanding how to set up and use a MySQL connector can help you handle your database tasks better. Remember, a well-implemented MySQL connector not only simplifies the integration process but also enhances the overall performance and reliability of your database-driven applications.
By using MySQL connectors, you can unlock the full potential of your MySQL databases and seamlessly connect them with your software ecosystem.
Estuary Flow presents itself as an excellent tool for this purpose, seamlessly managing MySQL connectors for real-time CDC data pipelines. With its advanced capabilities, it eases your database operations, thereby driving value and efficiency to your processes.
If you are looking to take your real-time DataOps with MySQL to the next level, give Estuary Flow a try. Sign up free here or get in touch with our team to discuss your specific needs.

About the author
With over 15 years in data engineering, a seasoned expert in driving growth for early-stage data companies, focusing on strategies that attract customers and users. Extensive writing provides insights to help companies scale efficiently and effectively in an evolving data landscape.
Popular Articles


